Advantages and Disadvantages of Handheld GPS

thumbnail

Advantages and Disadvantages of Handheld GPS

Actually there are many types of GPS, not just handheld / portable GPS, but also GPS Navigation and GPS Smartphone. For the first of these I will discuss in advance about the GPS handheld, and now I will explain the advantages and disadvantages of GPS handheld.
handheld gps
Handheld GPS
GPS handhelds have a high sensitivity in receiving GPS signals and some devices are capable of receiving dual satellite systems from GPS and Glonass. We can also determine the height of place and direction in an area with satellit signal, there are also various additional sensors, for example barometric altimeter and electronic compass so that the determination of height and direction can be done without using satellite signal. This is usually an option in the settings.

The use of barometric altimeter sensors usually must first be done altitude calibration somewhere. We can also use this barometric altimeter to plot air or ambient pressure from time to time, which can help to observe changes in weather conditions.

The advantage of this GPS compass is that it is not influenced by the magnetic field and can guide the direction accurately as it is guided by signals from the satellites (not the buit-in compass sensor). This tool is certainly very helpful when measuring the direction of Qibla.

The area is remote with no phone signal and does not have internet. We recommend choosing a handheld GPS device. Maps are already stored inside, though the images are very standard, such as the appearance of road maps and soil contours, the data maps in the handheld GPS more complete, but usually sold separately (for each country) and the price is quite expensive. Maps do not need to be installed or downloaded. Because portable GPS has been installed one country map when marketed.

GPS handheld is better, more durable, waterproof and suitable for outdoor activities. Users need not be afraid of the natural conditions, because handheld GPS devices or portable GPS are designed for nature activities. Using this GPS we can find the way when through high-sensitivity wilderness, which acquires satellite signals quickly and tracks locations in challenging conditions such as trees and cliffs.

The battery can be replaced because it uses AAA batteries. One portable GPS device can last up to 25 hours. Very suitable for adventure activities in areas far from electrical energy.

But the obstacle, GPS handheld in terms of price is still quite expensive, for a GPS device ranges between Rp. 2,000,000.00 to Rp.10.000.000,00 or about $ 150 USD to $ 750 USD.

The disadvantages of all GPS, including GPS handhelds are GPS will greatly affect the geographical conditions of where we are. GPS will work well if where we are still has a wide sky. The following will be described wherever the GPS will experience a weakness in its use:

1.When someone is in the forest. With the conditions of the trees are so much then the signals that can be received will be a little maybe even no depending on the width of the forest.
2.When someone is in the water or when someone is diving. Do not expect to use this tool when diving.
3. Electronic devices that can emit electromagnetic waves may affect performance degradation rather than GPS.
4. Buildings. Not only when inside the building, being between 2 tall buildings will also cause an effect like being in a valley.
5. Signals that bounce, eg when in between high-rise buildings, can disrupt the calculation of navigation tools so that navigation tools can indicate the wrong position or not accurate.
6. Glass film car, especially metal-containing.

Menus and Functions on GPS : Garmin 76 C/CSX

thumbnail
I will explain about some menus or functions on the GPS. This time I use GPS Garmin 76 C/CSX. Some GPS devices also have a similar functions.

How to operate Garmin 76 C or 76 CSX?
GPS Garmin 76 C / 76 CSX
1. Key Functions

Inside GPS 76 C there are several buttons that work include to:
A. Power button: Turns the unit on or off. If this button is pressed and released, it can work to adjust the backlight.
B. Zoom In / Out button: To set the size of the scale.
C. Find Button: To go to find menu page and display mob.
D. Quit button: To cancel data entry or close the page.
E. Page or Compass button: To go to the main page and turn the electronic compass off.
F. Menu Button: To enter options, confirm messages or data on-screen. This button can also be used for marking Sign and Waypoint.
G. Rocker Keys: To start moving lists, highlight fields, on-screen buttons, icons, enter data or move to the map section.

2. Getting Satellite Data

For the process of revenue data from satellite, then we must pay attention to the place and condition around. It is advisable to use the GPS in the open and have a wide view. The weather conditions must also be in good condition. For the steps are:
A. Turn on the GPS by pressing the power button. If the GPS has been turned on then it will say "Welcome". The page will quickly face the satellite page.
B. Observe the satellite page and GPS status message when it appears at the top of the page, and soon it will look like a GPSmap. This indicates it will start to search for satellite exploitation status. Not long after that will automatically show our position (latitude and longitude). Visit Determine Coordinate of Place with GPS for more info.

3. Selecting a Page

For all required information or data can be found in four main pages (display screen). These pages include satellites, maps, pointers, and menus. The trick is to press the page button to find the pages.
A. Satellite page: provides a reference for tracked satellites.
B. Page trip computer: provides data and information related to the science of shipping.
C. Page map: provides a view of a map and reference our navigation movement.
D. Page compass: provides guidance for a purpose and direction.
E. Page altimeter: provides path and pressure elevation.
F. Main menu: an existing directory in GPS to specify other settings.

4. Define Waypoint

Waypoint is a marking of places obtained by satellites in a GPS. To mark a place, we can access in the Find Menu by:
A. Press the page button and select the menu page. Press the Up or Down button and select the "Mark" section.
B. Press the enter key. The mark waypoint page will appear with the word "OK?", Hit enter. Waypoint has been stored in GPS memory.

5. Go to the Waypoint Menu
To enter the waypoint we have marked, then we use the Go To facility. How to use it is:
A. Press the page button and select the menu page. Press Up or Down button and select "waypoint". Press Enter. The waypoint page will appear.
B. Press the Up or Down button and select the tab that contains the desired waypoint name and press Enter. The existing waypoint review page will appear.
C. Press Up or Down button to select "GoTo" and press Enter.

6. Exploration on a Waypoint
In the use of the "Go to" facility, we will be directed to follow the directions on the waypoint. The directions provided are N, S, E, W (North, South, East, West). If we cancel, we can use the compass pointing stick to divert the direction toward us. The steps are:
A. Press the page button repeatedly until the compass page is shown. This page contains a bookmark that marks the direction to go.
B. Press the quit button to move to the map page and watch our progress toward the waypoint. The pointer line will show the map and the position arrow movement as we move it.
C. Press the quit button again to move to the travel page. This page provides travel data such as a travel odometer, maximum speed, and more.
D. To stop navigation, press Menu then select stop navigation and then press Enter.

7. Cleaning Track Log
If we have used GPS for multiple trips, then the map view will be full because storing tracks or paths that we have been through. To use this facility the way is:
A. Press the page button and select the menu page.
B. Press Up or Down button and select "Tracks".
C. Press Enter. Use the Up button and select "Clear". Press Enter.

8. Using Map Page 
To use the map page can be done by:
A. Press the page button to go to the main page to the map page.
B. Press the menu button to navigate to the map page selection.
C. Start moving and observing the position arrow on the top of the map. Use the Rocker button to move and move highlights a map item or look into other map areas.

Determine The Coordinates of a Place with GPS.

thumbnail
In the calculation of Islamic Astronomy, the thing that is always required is the coordinates of a place. Many ways and tools can be used to know these coordinates. One of the most famous ways is using GPS (Global Positioning System)

GPS is a navigation and positioning radio system that utilizes satellites as a means of communication. This tool is usually used in vehicle navigation, be it land, sea or air vehicle. Ship and aircraft communication with the station is needed, in order to avoid accidents. GPS is used to know each ship or aircraft position, then reported to the tower / station supervisor at the nearest port or airport.

This GPS will monitor signals from satellites, then GPS will accept the position of the place be it latitude, longitude or altitude place on Earth.

In the Islamic Astronomy, GPS that easy to use is a type of handheld GPS that can be taken anywhere.

GPS has a different level of accuracy, depending on the brand and type of GPS. but overall the tool is quite accurate in determining the coordinates of a place or area.

In this explanation, I will practice using GPS Garmin 72H, but overall, various GPS has a similar way to operate GPS for coordinate determination. The way is :

1. Turn on the GPS in the field, not in the room, around tall buildings, tunnels, and dense forests.

2. Wait a while, about 1-3 minutes, so that GPS receives satellite to make configuration latitude, longitude and altitude data complete.

3. The minimum number of satellites captured to generate coordinates is 4 satellites. And wait a while until the "Location" or "Accuracy" sign shows the smallest number. That sign is the maximum error of the GPS point being, which is predicted by GPS satellite.

4. Then record the coordinates that appear.

determine coordinate with gps
Garmin GPS 72H
Souce : https://www.amazon.com
Example image above, the resulting coordinates are 38 degrees 51,498 minutes North Latitude (N) and 94 degrees 47.838 minutes West Longitude (W).

5. if you want to know the height of the place, press the "page" several times until entering on the page high information place.

Good luck!

Total Solar Eclipse August 21, 2017

thumbnail

Today (August 22, 2017) is a special day for the United States and its surrounding communities, there will be a very rare eclipse of the Sun Total, among the cities that passed are Oregon, Montana, Idaho, Wyoming, Nebraska, Iowa, Kansas, Missouri, Illionis, Kentucky, Tennesse, Georgia, North Carolina and South Carolina.

The partial eclipse phase will begin at 12:01 UTC-4. It reaches a maximum around 13:33 UTC-4 when the sun is 81% blocked by the moon. Partial eclipse ends at 15:00 UTC-4. For more details please visit NASA.

Total solar eclipse in the United States described the American Space Agency (NASA) through a video duration 04 minutes 25 seconds. The visualization contains details of eclipse location and explanation of why eclipses can occur. According to NASA, the eclipse will occur along 112 kilometers. In the video looks the line that seemed to divide the Land of Abang Sam from Oregon on the west coast of lau, to South Carolina on the northeast coast. See the following vidio:


One of the greatest features of a total solar eclipse happening in the United States today is to be the last eclipse for a long time, an eclipse of this type will happen 600 million years.

When the sky is dark you will feel the temperature down slightly. You may also be able to see and hear animals and insects going into their nightly cycles or nighttime routines. Remember that it can be a cloudy day but where you are, the sky will remain dark. More than a few days before, it would be difficult to know whether the sky might be cloudy or not.

Some things need to be a concern when the solar eclipse. Do not look directly at a partial solar eclipse. It can cause permanent damage to your eyes. Do not look through sunglasses, binoculars, or telescopes. You have to get special glasses known as "eclipse viewing glasses", if using binoculars or a telescope should also be equipped with special filters. Here's what you need to know in order to keep your eyes safe during an eclipse.

Do not forget also to perform the eclipse prayer !, please visit the following page for the Procedure of Performing The Eclipse Prayer.

Ordinance of Eclipse Prayer

thumbnail

Source : http://www.mutiarapublic.com

On this day, August 07, 2017 there will be an eclipse at midnight until the day move on August 8, 2017. at that time the sun's light reflected to the Moon will be obscured by the Earth's shadow.

This event becomes very interesting if observed, especially if we can record or immortalize it. But do not forget!, when the eclipse occurs, either the eclipse of the Moon or the Sun, is devoted to doing the eclipse prayer.

Then how the procedure of the eclipse prayer?. In the book of "Zaadul Ma'ad", the work of Ibn al-Qayyim is explained about the procedure of performing the eclipse prayer (Qayyim 1438: 349-356):

1. Intend in the heart and should not be mentioned because mentioning the intention does not include in the guidance of the Prophet Muhammad (Sunnah/Hadeeth) and the Prophet also never taught him intentions on certain prayers to his companions.

2. Takbiratul ihram is doing Takbir as usual prayer.

3. Read the Iftitah and Ta'awudz, then read the Al-Fatihah and read a long Surah (like the Al Baqarah) while being stitched (hardened voice, not soft) as contained in the hadeeth of A'ishah:
جهر النبى - صلى الله عليه وسلم - فى صلاة الخسوف بقراءته
"The Prophet annihilated his reading during the eclipse prayer." (Narrated by Bukhari no 1065 and Muslim 901)

4. Then doing Ruku' while extending it.

5. Then rise from Ruku '(I'tidal) while saying "Sami' Allah li Man Hamidah, Rabbana wa Laka al-Hamd"

6. After this I'tidal did not directly prostrate, but continued by reading Al-Fatihah and long Surah again. This second stand is shorter than the first.

7. Then doing Ruku' again (second Ruku') which length is shorter than Ruku' before.

8. Then rise from ruku' (I'tidal) again.

9. Then prostrate as long as Ruku', then sit between two prostrations and then bow down again.

10. Then rose from prostration and worked on the second raka'at as the first raka'at only the reading and the movements are shorter than before.

11. Tasyahud.

12. Greetings (doing Salam).

13. The priest then gives a sermon to the congregation that contains the suggestion for dhikr, praying, alms, and freeing slaves.

Capture the Phenomenon of Partial Lunar Eclipse 7-8 August 2017

thumbnail

Visualitation of Partial Lunar Eclipse 7-8 August 2017
Source : MrEclipse.com
Date 7-8 August 2017 is a special date where on that date there will be a rare phenomenon, the phenomenon of partial lunar eclipse. The phenomenon would be very interesting if we managed to record and immortalize it.

But capturing images from the lunar eclipse is not an easy thing, sometimes a photographer difficult to take pictures, due to the lunar eclipse conditions that enter the full phase, the moonlight will be brighter.

At the time of the full moon, the earth is between the Moon and the Sun. The sunlight is reflected by the Moon towards us, so there is no Earth's shadow on the Moon that is used to adjust the contrast. Unlike at the time of the crescent moon, Crescent moon can be recorded with longer exposure or darker background to show the best light, although it is sometimes difficult to do.

So how to capture a lunar eclipse that right? We have a few ways and tricks for that.

1. Take pictures with twilight mode. If your camera does not have manual controls, choose the twilight shooting mode. With this mode, a very bright moonlight will be photographed with a fairly short exposure. If there is no twilight mode then use the automatic mode, and use the flash. The flash will shorten the exposure time so the moon does not experience overexposure. For close-up wear the highest lens enlargement setting.

2. Manual mode. Set ISO to a low value of 80 or 100 with a 1/80 or 1/100 exposure and f / 6.6 aparture.

3. Adjust the focus. If your camera has "Infinity" mode then it is great. If not there, autofocus is also good.

4. Use a support such as a tripod or a strong support. Enable the image stabilizer in the lens. Remember, the slightest movement has made the image obscure. When using a DSLR, you need a telephoto lens (minimum 300mm). If there is no tripod set ISO to 400 or more to get a shorter exposure without making the image too dark. High ISO values ​​are high noise, so do not use ISO too high.

5. Do not limit snapshots. With a large memory card capacity, you can take multiple shots on an ongoing basis. This is to get the best results, especially with the telephoto lens DSLR camera. Taking pictures with different exposure lengths increases the chances of getting the best photos. When the moon is near full, start with a low ISO, usually 100 with f / 6.6 aperture, and a 1/100 second exposure length. Periodically increase the exposure until the moon image becomes dark, it can take the exposure value 1/60, 1/50, 140, so on regularly.

6. Choose an interesting background. Fortunately the moon moves slowly so make sure enough time to get the background in the form of buildings, trees, or other objects to support the image of the moon in the right position.

7. Edit photos with software. Start by cutting a lot of black background and then adjust the brightness and contrast to get the desired result. We usually choose to reduce saturation because in reality the moon was relatively colorless.

Good luck!.

Introduction to Islamic astronomy (Falak)

thumbnail
Falak (Orbit)
Source : bbc.co.uk
The definition of Islamic astronom (Falak) according to language means orbit, whereas according to the term, Falak is a science, the science that discusses the astronomical conditions of celestial bodies associated with Islamic Shari'a. There are 4 scopes in the study of Islamic astronomy :

1. Qibla direction = discuss the Islamic Shari'a on liability facing the Qiblah while praying, even when not only praying but also when slaughtering sacrificial animals and when burying. To know the direction of the Qiblah can be traced with the science of Islamic astronomy in the discussion of the various directions on the surface of Earth that is experienced from geodesy science. visit this link to know what the Rules of Facing The Qibla.

2. Time of Salat = discusses the obligation to perform the prayers in due time. To know the time of prayer is also required Islamic astronomy science that is experienced from the science of the spherical trigonometry  in the discussion of the daily movement of the Sun's pseudo Earth, visit this link to know what the Prayer Times Marker.

3. The first lunar month = this discussion started from the obligation to perform fasting during Ramadan, when will Ramadan come ?, in this case we can know with Islamic astronomy that discusses the Crescent Moon Phase on the surface of the Earth, The phase is influenced by the circulation of the Earth against Sun, because the light of the Moon comes from the Sun, so the Moon as the Earth's natural satellite reflects light from the sun that directly fell to Earth.

4. Eclipse = this discussion also started from the Islamic Shari'a regarding the extinction in praying during the eclipse, when will the eclipse happen ?. In this case we can also know when the eclipse occurred with Islamic astronomy that discusses the phase of conjunction and opposition of the Sun, Earth, Moon in a straight line.

Islamic astronomy is not as difficult as it is in our minds. Islamic astronomy is fun! It has become one of the most rare sciences of today. Indeed seen by the eyes of astronomy more advanced knowledge, but it is a modern astronomy. Not Islamic astronomy. Rarely anyone learns this science, when in fact this science is very important because it is needed in the religion of Islam.

Partial Lunar Eclipse August 2017

thumbnail
World is enlivened with a total solar eclipse that will occur in the United States on 21 August 2017. It's in America, but in Indonesia there are other events that are not less interesting that partial lunar eclipse. The astronomical event will occur 7-8 August 2017.

Partial lunar eclipses occur when the earth moves between the moon and the sun but not exactly straight in a line. When a partial eclipse occurs, a small part of the moon's surface is covered by the darkest part of the earth's core shadow or the so-called umbra. The remainder of the moon's surface is covered by the outer shadow of the earth or the so-called penumbra.

Launch Time and Date, partial lunar eclipses will occur when two astronomical events occur simultaneously. The event will occur when the moon is in full or full moon. When the earth moves between the moon and the sun but not exactly straight in one line occurs simultaneously.

However, not every full-moon partial eclipse can happen. This happens because the moon moves around the earth with a slope of orbit about 5 degrees to the Earth's orbit and the sun (ecliptic). Because of the moon's orbital tilt, not every new moon phase and full moon, the moon is exactly parallel to the earth and the sun.

Eclipses can only happen near the node point. The natural phenomenon occurs when a full moon occurs near a node, and a solar eclipse occurs when a new moon occurs near a node.

Information of Partial Lunar Eclipse August 2017
Source: eclipse.gsfc.nasa.gov/LEplot/LEplot2001/LE2017Aug07P.pdf

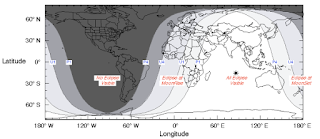
The partial lunar eclipse from 7-8 August 2017 will take place at 22:50 UTC+7 on August 7, 2017 (shown above with P1) as the Moon begins to enter the Earth's penumbral shadow. Then, a small portion of the Moon's face begins to enter the Earth umbra shadow from 00:22 UTC+7 (U1) to 02:18 UTC+7 (U4), its own peak will occur at 01:20 pm (Greatest), ie August 8, 2017.

The lunar eclipse will then end entirely when the Moon leaves the Earth penumbra shadow at 3:50 UTC+7 (P4). That way, the duration of this lunar eclipse reaches 1 hour 55 minutes with the maximum percentage of the peak of the eclipse is 24% disk tergerhanai Moon.

This partial moon eclipse event is quite safe to see with the naked eye with no tools like a binoculars or a telescope. Unlike solar eclipses that require special filtered glasses to protect our eyes from the dangers of the Sun's glare.

This partial lunar eclipse is included in the Saros 119 series and is the 62nd eclipse of a total of 83 eclipses in the series. In this case, the next Saros 119 or 63rd eclipse of the series will occur in about 18 years, precisely on 20 August 2035, which unfortunately is not visible from most parts of Indonesia.

But for partial partial eclipse 7-8 August 2017, Indonesia became one of the best locations to observe it. For those of you who happen to be out of Indonesia during a partial lunar eclipse later, do not worry, this eclipse can also be seen in most of Africa, most of Europe, all of Asia, Australia and Oceania countries.

Information of Partial Lunar Eclipse August 2017
Source: eclipse.gsfc.nasa.gov/LEplot/LEplot2001/LE2017Aug07P.pdf