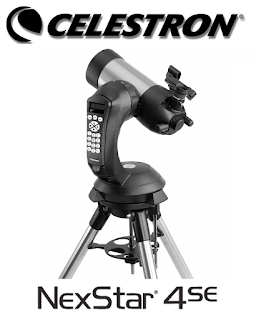
Operational Telescope : Celestron Nexstar 4 SE

thumbnail
In the previous post, we have discussed about the parts and functions of Celestron Nexstar 4 SE telescope, visit this link Celestron Nexstar 4SE  .In this post, we will discuss about the operational of this telescope. here are some guides:
celestron nexstar 4se
Source : Manual Book Celestron Nexstar 4 SE
1. Assembling.
a. Set up a tripod and set the plain by using a waterpass.
b. Attach the mount and the telescope tube.
c. Attach the star pointer and calibrate it by adjusting altitude and azimuth knob, keeping the pointer pointing at the same point as the point on the telescope tube.
d. Install the energy. Energy can be obtained by installing 12v AC adapters or by using 8 AA batteries.
e. Attach the hand control

2. Positioning 
There are two positions that can be used to operate the telescope, depending on what method is used :
a. Alt-azimuth Method,
By this method, the operation of the telescope will correspond to the horizontal coordinates, the telescope will move horizontally and vertically. with this method the telescope must be arranged northward with the aid of the compass, then the telescope tube is set to the index position.
b. Equatorial Method
By this method, the operation of the telescope will correspond to the equatorial coordinate, the telescope will move to adjust the declination value and ascensio recta value of celestial body. with this method the latitude stick must be adjusted according to the observer's latitude, then the tube is set at the index position, and the position of the telescope must face to the meridian.

3. Operational 
a. Set Up the Controller 
There are some rules to set:
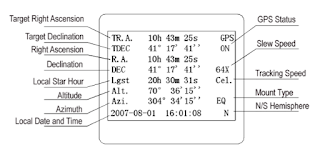
- Coordinates, can be input manually or through a city database
- Date
- Time, current time at the time of setting.

b. Alignment
- Sky Align, using this alignment we will be guided by the telescope. telescopes will choose the best celestial bodies to serve as alignment objects, can be stars, planets or other objects that are easy to detect.
- Auto Two-Star Align, using this alignment we will be selected 2 stars automatically to serve as alignment object.
- Two Star Alignment, we need to select manually 2 stars for the alignment object.
- One-Star Align, we need to choose one star for the alignment object.
- Solar System Align, we need to choose one object that include to solar system, that is planet or sun.
- EQ North / EQ South Alignment, this alignment is done when we choose to use equatorial method when doing step positioning. such as some alignment above, this alignment also has some kinds : EQ Auto Align, Two-Star Align EQ, One-Star Align EQ, EQ Solar System Align.

To improve calibration accuracy, choose alignment that supports a large number of sky objects (2 or more), if alignment is done but the accuracy level is bad, so alignment can be fixed with "sync" menu.

c. Tracking
After doing some arrangement as we mentioned above then telescope can be enabled to see the celestial objects automatically and follow it's movement. there are several objects that can be observed, including by using the following menu:
- LIST Menu, to search for sky objects "Named Star, Named Object, Double Stars, Variable Star"
- Catalog menu (M, CALD, NGC, STAR), to search for celestial objects through the number of objects.
- PLANET menu, to search for planetary celestial bodies.

Observation of celestial bodies can also use several methods such as:
- Tour Mode: to see interesting sky objects when observation time

- Constellation Tour: to see and observe the configuration of the stars that make up the constellations.

d. Focusing 
This stage is to be done to sharpen the image produced on the eyepiece lens, this stage is done by turning Focuser on OTA until our eyes feel comfortable to see the object, and the result object is not blur. Each observer's individual eye is different in focus settings, this is because of the possibility of eye defects in the eye's lens

e. Setup Tracking
Telescopes can follow the movement of celestial bodies, but it must be set in advance setup tracking with 2 settings:
- Tracking Mode, must adapt to the telescope mounting method. (Alt-Az, EQ North, EQ South)

- Tracking Rate, must adjust to the object being observed (Sideral, Lunar, Solar).

If yo want to compare the method of this telescope with other telescope visit this link. Opertional Telescope : Ioptron Minitower II.
The Pole of Earth and The Point of Compass

thumbnail
The Poles
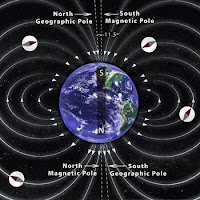
Pole are defined as an axis, the polar division of the earth exists a variety, including the magnetic poles of the earth and the geographical poles of the earth:

The Poles of the Earth
Source : http://www.calendarinthesky.org
1. Earth's Magnetic Pole
Have you ever had a compass? the compass you have will show you the direction of North, East, South and West. This direction is a magnetic direction. The direction indicated by the compass is the result of the pulling force of the Earth's magnetic poles.
The Earth's magnetic pole is not right at the Earth's axis, the Earth's magnetic pole position is fluid, the North direction is indicated as a magnetic North that is affected by the gravitational pull force of the earth, so it has a different value every day, and every where.

2. Earth's Geography Pole
This pole is the original axis of the earth, its position remains at one point, and does not change. The polar position is at 90 degrees from the Equator (North Pole), and also -90 degrees from the Equator (South Pole). The rotation motion of the earth for approximately 24 hours rotates through this axis.
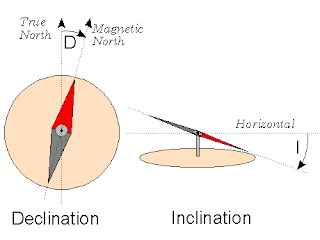
Inclination and Declination of The Compass
Source : http://digilander.libero.it
Compass is a tool that use the magnetic poles of the earth. Although the compass does not show the right direction, it can still be used accurately (leading to Earth's geographical poles) with some corrections, such as declination and inclination.
Magnetic declination is a horizontal shift toward the east or the west. Magnetic Inclination is a vertical shift toward the north or east direction of the compass. The value of this declination changes every day, we can check at Magnetic Declination. Meanwhile, the inclination value varies everywhere, depending on the position of the compass in the latitude. If the compass is in the southern latitudes, then the inclination of the compass will lean towards the south, and vice versa.

Points of The Compass
Source : https://en.wikipedia.org
Point of Compass is a guide to determine direction, usually used in Navigation system. There are 8 principle directions in this point of the compass system. Namely : North, Northeast, East, Southeast, South, Southwest, West, Northwest.
There are several ways to know the true winds, one of them is by using a compass as I mentioned above. Another way is to use the Sun :

1. Shortest shadow
Plug the stick to the ground in a flat position. With this method we are only looking for the shortest shadow when meridian pass/zawal (Sun at the zenith point), then we see the Sun declination value, if the declination of the Northern Sun is positive, so the shadow of the Sun points south direction, if the declination is South or the value is negative, so the shadow of the Sun leads North direction. But this method has a weakness, if the Sun is right above where we are, so there will be no shadow.

2. Shadows before and after Merpass / zawal
Plug the stick to the ground in a flat position, then make 1 to 3 circles around the stick with the stick as the center point. Observe before merpass, and observe the shadow that the end of the line touching the circle lines you have created. And make a point on the tangent. Observe after merpass, and observe the shadow that the end of the line touching the circle lines you have created. And make a point on the allusion. Connect the 2 points. The first point shows the true West direction, the second point shows of the true East direction.

3. Use the azimutal value of the Sun
This method is practically easier, but this method uses calculations. the first way is Shooting the Sun, then Counting the azimut of the Sun and then pointing towards 0 value (True North).

The above ways will be explained in another article.

The Universe is Not a God

thumbnail
The feast of Eid al-Adha is a day to commemorate the Prophet Ibrahim's incident that is willing to slaughter his son, the prophet who is willing to do anything for the sake of his God. God of the universe, the God who created the heavens, the earth and the whole.
universe is not a good
Allah is the creator of this universe
In addition to the story of slaughter of Prophet Ismail by Prophet Ibrahim, there is something quite interesting from the story of the prophet Ibrahim, that is when the journey of Prophet Ibrahim looking for his God. Prophet Ibrahim traveled for days to seek his God, and he observed all the objects of the universe, from the stars, the moon and the Sun. this story is in the Qur'an Surah Al-An'am verse 75-79 :

Verse 75 :
وَكَذَلِكَ نُرِي إِبْرَاهِيمَ مَلَكُوتَ السَّمَاوَاتِ وَالأرْضِ وَلِيَكُونَ مِنَ الْمُوقِنِينَ
"And thus We show Abraham the signs of the glory (We who are) in the heavens and the earth, and (We show them) that Ibrahim is of the believers."

Verse 76 :
فلما جن عليه الليل رأى كوكبا قال هذا ربي فلما أفل قال لا أحب الآفلين
"When the night has darkened, he sees a star (then) he says: "This is my Lord" But when the star drowned he said: "I do not like the drowning ones".

Verse 77 :
فلما رأى القمر بازغا قال هذا ربي فلما أفل قال لئن لم القوم الضالين
"Then when he saw the rising moon he said:" This is my Lord ". But when the moon sets, he says: "If my Lord has not guided me, I will be among the heretics."

Verse 78 :
فلما رأى الشمس بازغة قال هذا ربي هذا أكبر فلما أفلت قال يا قوم إني بريء مما تشركون
"Then when he saw the rising sun he said:" This is my Lord, this is the greater one ", so when the sun sets, he says:" O my people! I am detached from what ye associate (the Sun). "


Verse : 79
إني وجهت وجهي للذي فطر السماوات والأرض حنيفا وما أنا من المشركين
"Verily I have exposed myself to the Lord who created the heavens and the earth tending to true religion, and I am not of those who associate the God."

Explanation :
In the above verses, Allah ordered the Prophet Muhammad to narrate the propagation of Prophet Ibrahim who invites humans to be religious monotheism and avoids the worship of a statue that brings human to error, accompanied by strong reasons and evidence. The universe and all its contents are powerful to prove the unity of God and the wickedness of the idolaters (Musyrikiin).

Verse 75.
In this verse Allah gives an explanation again, how Allah revealed the majesty of his creation in the heavens and the earth. Allah revealed to Ibrahim the heavenly bodies of varying shapes and arrangements, all of them circulating according to each rule on a regular basis. Earth consisting of layers that contain lots of minerals and jewelry, is very useful and give many benefit to humans.
All of that is a proof of Allah's majesty, which can be understood by human, by thinking according to his word (Al-Qur'an).
Allah also explains the purpose of the introduction of Ibrahim to the beauty of his creation, in order to be made evidences in preaching to unbelieving idolaters (Musyrikiin), and become a guide for him to be someone who truly believe in the unity of Allah.

Verse 76.
After that Allah explained the process of introducing Ibrahim to God in details explanation. first experience of Prophet Ibrahim when looking at the stars. at the time the stars appear to glow and when the star is not glowing.
Ibrahim saw a brightest star. Then the question arises in his heart. "Is this my Lord? But after the star sank and disappeared from his view, there was a belief that he was unhappy with the drowning and disappearing, let alone regarding it as God.
This was the reason of Ibrahim to break the faith of his people that "all that changed was not deserved to be a God". The conclusion of Ibrahim is the conclusion of the right way of thinking that accordance with nature. And anyone who makes same observations so they will produce same conclusion.

Verse 77.
This verse is similar to the previous verse. Allah also explains the observation of the Prophet Ibrahim against the luminous celestial bodies and the greater, it is the Moon.
After the Prophet Ibrahim saw the rising Moon, an impression came to his heart to say, "Is this my Lord?" Then after the moon sets out from the horizon and disappears from his view, he gives the same statement as when he saw the stars set, to his people to know that the Moon is also not God. The second statement of the prophet Ibrahim is more appealing than the first.

Verse 78.
Allah tells his stronger insinuation. That is the observation of the Prophet Abraham to the sun, the most luminous celestial bodies in the universe,
When he sees the sun rising on the horizon, he says "What I see now is my Lord, It is greater than the Stars and the Moon." But after the sun set and disappeared from his view, he issued a warning to his people: "O my people, actually I escape from what you worship."
This insinuation is the stronger insinuation to silence his people so that they do not make any argument to deny the truth brought by Ibrahim.

Verse 79.
After some of his observations Ibrahim devoted himself to worshiping to Allah who created the heavens and the earth.
Ibrahim tended to the religion of monotheism (a religion that held that God is one) and stated that other religions were void, and he was not among the polytheists. The Universe is not a God, and the God is the only one. 

Operational Telescope : Ioptron Versa 108 ED APO OTA with Ioptron Minitower II-8300-2G Mount

thumbnail
A. The Parts
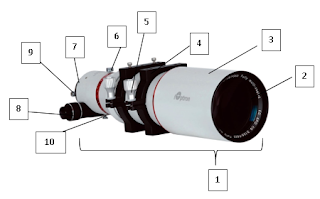
The Parts of OTA
The Parts of OTA
1. Telescope Tubes
2. Objective Lenses
3. Lens Fence
4. Tube Clamps
5. Clamp Key
6. Focuser Hinges Key
7. Eyepiece Placement Hole
8. Focuser
9. Eyepiece Key
10. Focuser Key

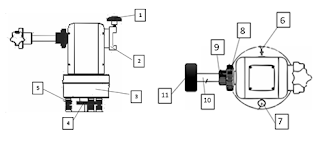
The Part of Mount
The Part of Mount
1. Clamp Lock
2. Telescope Tube Clamps
3. Mount Hinges
4. Azimut / Horizontal Key
5. Screw Regulator of the Square
6. Southern Sign
7. Waterpass
8. Vertical Hinge Key
9. Balancing Counter Key
10. Iron Measuring Equilibrium
11. Load Balancer
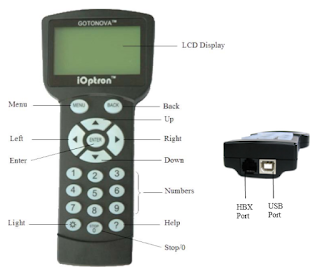
The Button of Controller

B. Specifications
1. OTA (Optical Tube Assembly)
Aperture: 108mm
Focal Length: 648mm
Ratio: F6
Lens Type: 2 elements Air-spaced ED S-FPL51 + S-NBM51 glass
Focuser: 2 ", 360 ° Rotatable 1:11 Crayford dual speed focuser
Tube Length: 535 mm (Fully Retractable)
Tube Weight: 12 lbs.

2. Mount
Mount: AltAzimuth Mount, Equatorial mount with special tripod
Body Materials: Aluminum
Motor: Dual-Axis DC Servomotor, DC12V
Speed: Dual-Axis, 9-Gear, Electronic (1 × 2 ×, 8 ×, 16 ×, 64 ×, 128 ×, 256 ×, 512 ×, MAX)
GPS: 32-channel GPS
GOTO System: GOTONOVATM 130,000 objects database
GOTO accuracy: 1 Arc Min. (Typical)
Tracking: Automatic
Battery: AA x 8 (Not Included)
Power Requirement: DC 12V ± 2V,> 1.2A
USB Port: Yes
Protocol : ASCOM
Firmware Upgrade: Yes
Computer Control: Yes

C. Usage

1. Installation (assemblying)
Installation of the device consists of a tripod, mount, telescope, ballast, hand controller, and others so that all installed properly and ready to operate.
One of the most important things in this step is balancing between the telescope with the balancer. The unbalanced state will affect the accuracy when tracking.
In addition, leveling (flattening position) of the tripod should also be considered, using the waterpas or (bubble level indicator) found on the bottom of the mount.

2. Initial Position Settings
Positioning the telescope on home position (parking position) or initial condition correctly. For the Ioptron MiniTower II telescope with Altazimuth Mode, the home position is facing the mount to the South and the OTA position is raised to the zenith. At this positioning stage the compass is required to show the exact South direction.

3. Operational
A. Set Up Controller
There are some important settings that need to be set:
1. Time
2. Time Zone
3. Coordinate Place
4. Mount type

B. Alignment
Although telescope already directed to the South and Zenith, but adjustments to the state of the sky (calibration) still needs to be done, because not necessarily our telescope is pointed to the South and Zenith appropriately.
There are several calibrations that can be done:
1. One Star Alignment
2. Two Star Alignmnet
3. Three Star Alignment
4. Polaris Position Alignment
The suggested calibration is calibration with 3 stars or with Polaris, but for locations with southern latitudes, Polaris calibration can not be used, because Polaris stars can not be observed in the southern latitudes.
Calibration of 3 stars can only be used at nighttime, in the daytime no stars can be observed cause the stars beaten by the sun, so for daytime observation, or Crescent observation for "rukyatul hilal", can be done  Sun Position calibration .
The calibration of the Sun position is not in the "One Star Alignment" menu, so we use another method, "Slew and Sync" menu, we navigate to the Sun in the "Select and Slew" option, then we sync the Sun's observations on the telescope lens with the "Sync to Target" option.

C. Tracking
After the data is loaded, and calibration is done, we can select the object to be observed by selecting "Select and Slew" menu. This menu provides various objects that can be observed. There are about 13,000 objects in this mount database. By pressing "enter" the tracking process can automatically be done.
Display on the Controller
D. Focusing
This stage is to be done to sharpen the image produced on the eyepiece lens, this stage is done by turning Focuser on OTA until our eyes feel comfortable to see the object, and the result object is not blur. Each observer's individual eye is different in focus settings, this is because of the possibility of eye defects in the eye's lens
.
E. Setup Tracking
The next stage is to set tracking speed, there are several options:
1. Sidereal Speed ​​/ Celestial Speed, observations for the stars
2. Solar Speed, Observations for the Sun and the Planet
3. Lunar Speed, Observation for the Moon / Crescent

Prayer Times Marker

thumbnail
Source : http://www.algonaefree.org
One of the valid conditions of prayer/salat is in time. The times of prayer have been arranged in the Qur'an and Hadith, namely in Surat al-Isra ': 78:

أقم الصلاة لدلوك الشمس إلى غسق الليل وقرءان الفجر إن قرءان الفجر كان مشهودا

Meaning:
Establish prayer from after the sun slip until dark of night and time of the Qur'anal Fajri. The Qur'anal Fajri is actually witnessed (Surat al-Isra`: 78)

According to the commentators, in this verse is mentioned the time of prayer that is after the sun slipped, the prayers of Dhuhur and Asr. While the dark night is the prayer of Maghrib and Isha` and Qur`anal Fajri is the prayer of Shubuh .

Whereas if you want to more specifically know the theorem about the times of prayer, we can refer to the hadith of Rasululah that saheeh and qath`i. Among these are the following hadith, which means:

From Jabir bin Abdullah ra. That the Prophet was approached by Gabriel and said to him, "Rise up and do the prayer." So he did the Dhuhur prayer when the sun slipped. Then as Asr approaches and Gabriel says, "Wake up and do the prayer." So he did the Asr prayer when the length of the shadow of all things equal to the length of the object. Then the time of Maghrib approaches and Gabriel says, "Wake up and do the prayer." So he performed the Maghrib prayer when the sun sets. Then Isha time comes and Gabriel says, "Wake up and do the prayer." Then he SAW perform the Isha' prayer when syafaq (red clouds) disappears. Then when Shubuh comes and Gabriel says, "Wake up and do the prayer." So he did the Shubuh prayer when dawn broke. (Ahmad, Nasai and Tirmizy.)

1. Fajr Prayer Time (Shubuh)

Starting from the appearance of "Fajr Shadiq/True Dawn" until the rising of the sun. The dawn in Arabic is not the sun. So when mentioned dawn, it is not sunrise. Dawn is a rather bright white light that spreads on the eastern horizon that comes just before sunrise.

There are two kinds of dawn, namely "Fajr Kazib/ False Dawn" and "Fajar Shadiq/ True Dawn". "Fajr Kazib" is the dawn that "lying" as the name implies. That is, in the early hours of the morning, there is a light that extends and leads up in the middle of the sky. Shaped like a wolf's tail, then the sky becomes dark again. That is "Fajr Kazib".

While the second dawn is "Fajr Shadiq", which is the dawn of a really dawn which is a rather bright white light that spreads on the eastern horizon that appears shortly before sunrise. This dawn marks the entry of the Shubuh time.

Shubuh Time
Simulation of Shubuh Time
While the end of the Shubuh time is the rising of the Sun.

In the science of astronomy, the position of the Sun is usually denoted in an altitude value. For the beginning of dawn itself varies, some are wearing a sun-height value of -20 degrees to -15 degrees below the horizon.

Shubuh Time
Difference of Shubuh Height Value

2. Dhuhur Prayer Time

Starting from the sun is just above the head but has started to slightly leaning towards the west. The term often used is the slipping of the sun. As free translation of the word "Zawalus Syamsi". But this term is often confusing because if it says that the "sun is slipping", some people will wrinkle his forehead, "What is the slipping of the sun?".

"Zawalus Syamsi" is the time at which the position of the sun is above our heads, but a little has begun to move westward. So not right above the head. Or in Arabic terms also known as Istiwa'.

Shubuh Time
Simulation of Dhuhur Time
The end of the prayer time of Dhuhur is when entering the time of the Asr prayer.

The value of the sun's height at the time of entry Dhuhur prayer is approaching 90 degrees.

3. Asr Prayer Time

There are some differences in starting this Asr prayer :

First opinion, Asr prayer begins when the shadow of an object is equal to the height of the object plus the shadow of the object when time Dhuhur. The value of the sun's height at this position is less than 45 degrees.

Second opinion, Asr prayer starts when the shadow of an object is equal to 2x height of the object plus the shadow of the object when time Dhuhur. The value of the sun's height at this position is about 26 degrees 34 minutes

Asr Time
Simulation of Asr Time
The third opinion of Asr prayer is Wustha prayer is the prayer performed in the middle between Dhuhr and Maghrib prayer. The value of the sun's height at this position is more or equal to 45 degrees

But the most famous opinion is the first opinion.

4. Maghrib Prayer Time

Starting from the setting of the sun and this has become the ijma` (agreement) of the scholars. That is since the loss of all the solar spheres in the swallow of the earth. And ended up entering the time Isha'.

Maghrib Time
Simulation of Maghrib Time
The value of the sun's height at the time of Maghrib prayer is approximately -1 degrees.

5. Isha' Prayer Time

Isha' prayer begins when the emergence of red clouds in the sky.
The value of the height of the sun is also different, there is a opinion that the height of the Sun during Isha' is -18 to -15 degrees below horizon.

Isha' Time
Simulation of Shubuh Time
And the end of the Isha' prayer is when entering the time of Shubuh prayer.

Isha' Time
Difference of Isha Height Value

Accurate Times

thumbnail
The Accurate Times application is a well-known application amongst the astronomers, this software is made by Mohammad Syawkat Audah. In this application there are several calculation programs, such as the program of Salat Time, Moon and Moon Setting program, Moon Phase, Hilal Visibility, Sun Ephemeris program, Hijriah-Masehi (Lunar-Sun) Calendar, Qibla Direction and also Solar and Moon position guidance program for telescope operation.

This application was originally a prayer time application adopted by the Jordanian Ministry of Religious Affairs for the early determination of the prayer time in Jordan, but at a later stage it developed to the point of calculating the conversion of the Hijriah-Mashi-Hijri date and the determination of the beginning of the continuing month on the visibility of the new moon .

The front view of the Accurate Times application

One of these in-app programs that reflects his thoughts is the Crescent Visibility or Visibility Hilal program the author has described in the previous chapter.

Crescent Visibility program display in the Accurate Times application

In this program provided several options for the determination of criteria:
- Waxing / Waning Crescent
This option is used to select the object we will look for visibility, whether young moon or old moon.
- Calculations
This option is used to select the basic reference of calculation, whether the calculation based on the geosentric point that will produce the essential moon, or from the surface of the earth (Toposentric) that will produce the hilal mar'i.
- Day of Calculations
This option is used to determine the state of visibility, at day of intent, 1 day or 2 days after.
- Time of Calculations
This option is used to select the visibility reference time, at sunset, when the Moon is set, or when the Best time, which is one of Mohammad Odeh's formulas also that the author has described in the previous discussion.

Map of Hilal Accurate Times Visibility

The above picture is the moon visibility map of the Beginning Moon of Shawwal 1438 in the Accurate Times application with youthful hilal, topocentric hilal, hilal on the day of ijtimak and hilal at best time.

Visit this link to download it. Download

When did 1 Dhul-Hijjah 1438 Begin?

thumbnail
The month of Dhul-Hijjah, or the month of Hajj in 2017 coincides with the year 1438. Ijtima' or the conjunction of the signing of the month of Dhul-Hijjah 1438 according to the book of Ittifaq Dzatil Bain happened on: Monday, 21 August 2017 18:35 UTC (Tuesday, 22 August 2017, 01:35 UTC+7). This conjunction coincides with the 17,256th month round in the Islamic date (Islamic Lunacy Number - ILN). In the evening of Tuesday, the crescent moon (hilal) will be visible in almost all parts of the world (see Hilal Visibility Map below).
Map of Crescent Visibility
Source : Accurate Times M. Odeh

Map of Hilal Visibility (Crescent) for 1 Dhul-Hijjah 1438. Most of the world will be able to see the moon on the evening of Tuesday, August 22, 2017. Thus calculation, 1 Dhul-Hijjah 1438 will fall on Wednesday, August 23, 2017.

In Indonesia, Insha Allah, there is no difference between the government and Islamic Organizations, especially Muhammadiyah and PERSIS. Likewise Saudi Arabia, which usually uses rukyatul hilal for the determination of the Wukuf date in Arafat and Eid al-Adha, will begin 1 Dhul-Hijjah 1438 H on the same day. The Ummul Qura calendar of Saudi Arabia shows 1 Dzulhijjah 1438 H falls on Wednesday, August 23, 2017.

If there is no official change from the government, then the following is the date of Wuquf and the holy day of Qurban, Eid al-Adha 2017 :
- Wukuf, 9 Dhul-Hijjah 1438 H is calculated on Thursday, August 31, 2017
- Eid al-Adha, 10 Dhul-Hijjah 1438 H is calculated on Friday, September 1, 2017
- Arafah Fasting year 1438 is calculated on Thursday, August 31, 2017

Below is a simulation of the moon's new state during the evening tuesday :

Calculation in the book of Ittifaq Dzatil Bain at Condrodipo, Gresik, Indonesia.

Ghurub (Sunset) Simulation at Condrodipo
Source : Stellarium 

Rukyatul Hilal Simulation at Condrodipo
Source : Stellarium

Capture the Phenomenon of Partial Lunar Eclipse 7-8 August 2017

thumbnail

Visualitation of Partial Lunar Eclipse 7-8 August 2017
Source : MrEclipse.com
Date 7-8 August 2017 is a special date where on that date there will be a rare phenomenon, the phenomenon of partial lunar eclipse. The phenomenon would be very interesting if we managed to record and immortalize it.

But capturing images from the lunar eclipse is not an easy thing, sometimes a photographer difficult to take pictures, due to the lunar eclipse conditions that enter the full phase, the moonlight will be brighter.

At the time of the full moon, the earth is between the Moon and the Sun. The sunlight is reflected by the Moon towards us, so there is no Earth's shadow on the Moon that is used to adjust the contrast. Unlike at the time of the crescent moon, Crescent moon can be recorded with longer exposure or darker background to show the best light, although it is sometimes difficult to do.

So how to capture a lunar eclipse that right? We have a few ways and tricks for that.

1. Take pictures with twilight mode. If your camera does not have manual controls, choose the twilight shooting mode. With this mode, a very bright moonlight will be photographed with a fairly short exposure. If there is no twilight mode then use the automatic mode, and use the flash. The flash will shorten the exposure time so the moon does not experience overexposure. For close-up wear the highest lens enlargement setting.

2. Manual mode. Set ISO to a low value of 80 or 100 with a 1/80 or 1/100 exposure and f / 6.6 aparture.

3. Adjust the focus. If your camera has "Infinity" mode then it is great. If not there, autofocus is also good.

4. Use a support such as a tripod or a strong support. Enable the image stabilizer in the lens. Remember, the slightest movement has made the image obscure. When using a DSLR, you need a telephoto lens (minimum 300mm). If there is no tripod set ISO to 400 or more to get a shorter exposure without making the image too dark. High ISO values ​​are high noise, so do not use ISO too high.

5. Do not limit snapshots. With a large memory card capacity, you can take multiple shots on an ongoing basis. This is to get the best results, especially with the telephoto lens DSLR camera. Taking pictures with different exposure lengths increases the chances of getting the best photos. When the moon is near full, start with a low ISO, usually 100 with f / 6.6 aperture, and a 1/100 second exposure length. Periodically increase the exposure until the moon image becomes dark, it can take the exposure value 1/60, 1/50, 140, so on regularly.

6. Choose an interesting background. Fortunately the moon moves slowly so make sure enough time to get the background in the form of buildings, trees, or other objects to support the image of the moon in the right position.

7. Edit photos with software. Start by cutting a lot of black background and then adjust the brightness and contrast to get the desired result. We usually choose to reduce saturation because in reality the moon was relatively colorless.

Good luck!.