Islamic Astronomy Software : Digital Falak

thumbnail
Android is a linux-based operating system for mobile phones such as smartphones and tablet PC. Android provides an opensouce platform for developers to create their own applications for use by a variety of mobile devices.

Android already has some changes starting from android version 1.1 to the current android version 7.0. Of course with the development and improvement of android, the users were involved to develop various applications, both for personal and public purposes.

Android development is also up in the field of Islamic Astronomy. The "Digital Falak" app is one of the applications of Islamic Astronomy based on android, created by Ahmad Tholhah Ma'ruf published in the Playstore. The application is made in 2012 but in 2014 this new application is released. And in the middle of 2015 this app is officially uploaded in Playstore and can be used by many people especially for android users. Download this app in Playstore or in Digital Falak Web
.
Digital Falak Icon
Digital Falak contains several programs, there is Prayer Time, Qibla Compass, Hijri Calendar, Location Data, and Istiwak Time.
Local Prayer Time and Masehi Calendar
• Prayer Time.
Prayer Time in this application displays some data that is: the time of salat Zuhr, Asar, Magrib, Isha, Imsak, Dawn (Fajr), Thulu, and Duha. Available in 2 time, local time and istiwak time. We can also adjust the criteria and ihtiyath time in the setting menu. The prayer time in this application also has the alarm for remember us to do pray.
Istiwa Prayer Time and Hijri Calendar
• Hijri Calendar
The Hijri calendar in Digital Falak uses the two-book method of making it by using "Fathu al-Rouf al-Manan" and "Nurul anwar". Users just choose which books to use in the settings menu. there is also Masehi/public Calendar

Qibla Compass and Rashdul Qibla Calculation
• The Qiblah Compass
The Qiblah compass is quite easy to understand especially for who do not know the calculation of the Islamic Astronomy, because in it already has a Qibla Compass program, the direction shown by the compass will face the qibla, but this application has a weakness, because the base of the compass using magnetic sensor, then this application is very influential with the magnetic force that surrounds the user.
The Qibla Compass feature also requires magnetic sensors, so for mobile devices that do not have magnetic sensors can not use this feature. Instead there is also a feature Rashdul Qibla calculation, the calculation of the time where the shadow of the Sun will face the qibla.

Location Data Menu
• Location data
Location data in digital falak can be used to find the latitude, longitude, height of place, time zone and place name according to the position in GPS. This data is always updated and can also update by using the internet after the phone is connected to the internet.

This application also there is a version of the website, we will discuss in the next article.

Operational Telescope : Ioptron Versa 108 ED APO OTA with Ioptron Minitower II-8300-2G Mount

thumbnail
A. The Parts
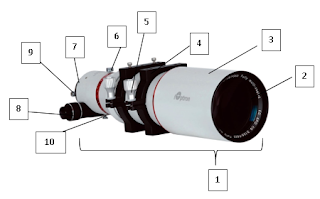
The Parts of OTA
The Parts of OTA
1. Telescope Tubes
2. Objective Lenses
3. Lens Fence
4. Tube Clamps
5. Clamp Key
6. Focuser Hinges Key
7. Eyepiece Placement Hole
8. Focuser
9. Eyepiece Key
10. Focuser Key

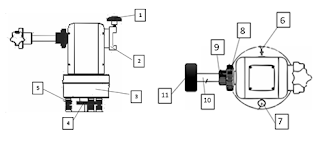
The Part of Mount
The Part of Mount
1. Clamp Lock
2. Telescope Tube Clamps
3. Mount Hinges
4. Azimut / Horizontal Key
5. Screw Regulator of the Square
6. Southern Sign
7. Waterpass
8. Vertical Hinge Key
9. Balancing Counter Key
10. Iron Measuring Equilibrium
11. Load Balancer
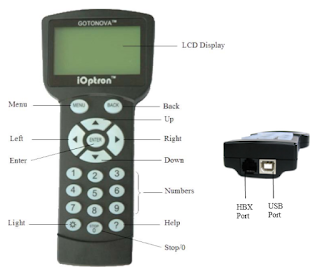
The Button of Controller

B. Specifications
1. OTA (Optical Tube Assembly)
Aperture: 108mm
Focal Length: 648mm
Ratio: F6
Lens Type: 2 elements Air-spaced ED S-FPL51 + S-NBM51 glass
Focuser: 2 ", 360 ° Rotatable 1:11 Crayford dual speed focuser
Tube Length: 535 mm (Fully Retractable)
Tube Weight: 12 lbs.

2. Mount
Mount: AltAzimuth Mount, Equatorial mount with special tripod
Body Materials: Aluminum
Motor: Dual-Axis DC Servomotor, DC12V
Speed: Dual-Axis, 9-Gear, Electronic (1 × 2 ×, 8 ×, 16 ×, 64 ×, 128 ×, 256 ×, 512 ×, MAX)
GPS: 32-channel GPS
GOTO System: GOTONOVATM 130,000 objects database
GOTO accuracy: 1 Arc Min. (Typical)
Tracking: Automatic
Battery: AA x 8 (Not Included)
Power Requirement: DC 12V ± 2V,> 1.2A
USB Port: Yes
Protocol : ASCOM
Firmware Upgrade: Yes
Computer Control: Yes

C. Usage

1. Installation (assemblying)
Installation of the device consists of a tripod, mount, telescope, ballast, hand controller, and others so that all installed properly and ready to operate.
One of the most important things in this step is balancing between the telescope with the balancer. The unbalanced state will affect the accuracy when tracking.
In addition, leveling (flattening position) of the tripod should also be considered, using the waterpas or (bubble level indicator) found on the bottom of the mount.

2. Initial Position Settings
Positioning the telescope on home position (parking position) or initial condition correctly. For the Ioptron MiniTower II telescope with Altazimuth Mode, the home position is facing the mount to the South and the OTA position is raised to the zenith. At this positioning stage the compass is required to show the exact South direction.

3. Operational
A. Set Up Controller
There are some important settings that need to be set:
1. Time
2. Time Zone
3. Coordinate Place
4. Mount type

B. Alignment
Although telescope already directed to the South and Zenith, but adjustments to the state of the sky (calibration) still needs to be done, because not necessarily our telescope is pointed to the South and Zenith appropriately.
There are several calibrations that can be done:
1. One Star Alignment
2. Two Star Alignmnet
3. Three Star Alignment
4. Polaris Position Alignment
The suggested calibration is calibration with 3 stars or with Polaris, but for locations with southern latitudes, Polaris calibration can not be used, because Polaris stars can not be observed in the southern latitudes.
Calibration of 3 stars can only be used at nighttime, in the daytime no stars can be observed cause the stars beaten by the sun, so for daytime observation, or Crescent observation for "rukyatul hilal", can be done  Sun Position calibration .
The calibration of the Sun position is not in the "One Star Alignment" menu, so we use another method, "Slew and Sync" menu, we navigate to the Sun in the "Select and Slew" option, then we sync the Sun's observations on the telescope lens with the "Sync to Target" option.

C. Tracking
After the data is loaded, and calibration is done, we can select the object to be observed by selecting "Select and Slew" menu. This menu provides various objects that can be observed. There are about 13,000 objects in this mount database. By pressing "enter" the tracking process can automatically be done.
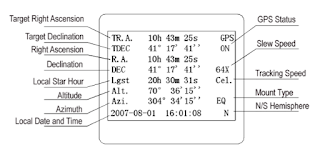
Display on the Controller
D. Focusing
This stage is to be done to sharpen the image produced on the eyepiece lens, this stage is done by turning Focuser on OTA until our eyes feel comfortable to see the object, and the result object is not blur. Each observer's individual eye is different in focus settings, this is because of the possibility of eye defects in the eye's lens
.
E. Setup Tracking
The next stage is to set tracking speed, there are several options:
1. Sidereal Speed ​​/ Celestial Speed, observations for the stars
2. Solar Speed, Observations for the Sun and the Planet
3. Lunar Speed, Observation for the Moon / Crescent

Examples for Qibla Calculation in Indonesia

thumbnail
In the previous post has been explained little about the formula of the direction of qibla for the region in Indonesia. so all places in Indonesia can use that formula to serve as a determinant of Qibla direction. Visit this Link. Qibla Formula for Indonesia

In this post, we will give 3 examples of calculations, first at Istiqlal Mosque-Jakarta, Baiturrahman Mosque-Semarang and al-Akbar Mosque-Surabaya.
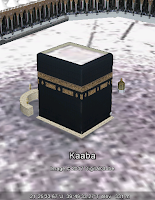
Coordinate of Ka'ba in Google Earth
These 3 examples will be calculated by the coordinates of the Ka'ba that took from the Google Earth App. The coordinate of Ka'ba is 21˚ 25 '33,67" N and 39˚ 49 '33.27" E.

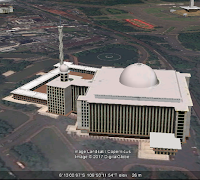
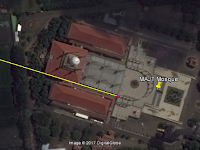
1. Istiqlal Mosque, Jakarta
Coordinate of Istiqlal in Google Earth

Qibla Calculation For Istiqlal Mosque :
a. Latitude: 6˚ 13' 00,97" S
b. Longitude: 106˚ 50' 11,54" E
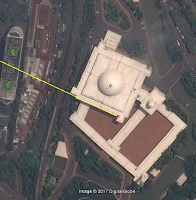
Istiqlal Qibla Direction
c. λd = (λx - λx). = (106˚ 50' 11,54" -39˚ 49 '33.27") = 67˚ 0' 38,27"
d. Cotan QD = Tan φk * Cos φx / Sin λd - Sin φx / Tan λd.
Cotan QD = Tan 21˚ 25 '33,67" * Cos -6˚ 13' 00,97" / Sin 67˚ 0' 38,27" - Sin -6˚ 13' 00,97" / Tan 67˚ 0' 38,27".
QD = 64˚ 50' 23,85"
e. QA = 360 - QD
QA = 360 - 64˚ 50' 23,85"
QA = 295˚ 09' 36,15"

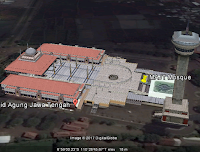
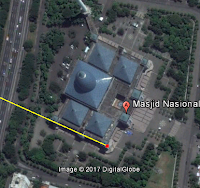
2. Baiturrahman Mosque, Semarang
Coordinate of Baiturrahman in Google Earth

Qibla Calculation For Baiturrahman Mosque:
a. Latitude: 6˚ 59' 00,23" S
b. Longitude: 110˚ 26' 45,67" E
Baiturrahman Qibla Direction
c. λd = (λx - λx). = (110˚ 26' 45,67" -39˚ 49 '33.27") = 70˚ 37' 12,4"
d. Cotan QD = Tan φk * Cos φx / Sin λd - Sin φx / Tan λd.
Cotan QD = Tan 21˚ 25 '33,67" * Cos -6˚ 59' 00,23" / Sin 70˚ 37' 12,4" - Sin -6˚ 59' 00,23" / Tan 70˚ 37' 12,4".
QD = 65˚ 30' 9,32"
e. QA = 360 - QD
QA = 360 - 65˚ 30' 9,32"
QA = 294˚ 29' 50,67"

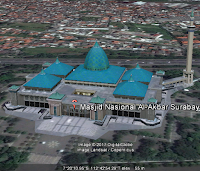
3. al-Akbar Mosque, Surabaya
Coordinate al-Akbar Mosque from Google Earth

Qibla Calculation For al-Akbar Mosque :
a. Latitude: 7˚ 20' 10,95" S
b. Longitude: 112˚ 42' 54,29" E
Al-Akbar Qibla Direction
c. λd = (λx - λx). = (112˚ 42' 54,29" -39˚ 49 '33.27") = 72˚ 53' 21,02"
d. Cotan QD = Tan φk * Cos φx / Sin λd - Sin φx / Tan λd.
Cotan QD = Tan 21˚ 25 '33,67" * Cos -7˚ 20' 10,95" / Sin 72˚ 53' 21,02" - Sin -7˚ 20' 10,95" / Tan 72˚ 53' 21,02".
QD = 65˚ 56' 13,92"
e. QA = 360 - QD
QA = 360 - 65˚ 56' 13,92"
QA = 294˚ 03' 46,08"

From the 3 examples above can be concluded that true the direction of the Indonesia is North West, its value is about 294 degrees.
Additional added :
- Remember! that the value of North latitude and East longitude is positive and the value of South latitude and West longitude is negative. Visit Spherical Earth System.
- In the trigonometry formula above use Cotangen formula, if you using a calculator or excel program can use :
For Excel Atan (1/(Tan φk *......)) or Atan((Tan φk *.......)^-1)
For the Scientific calculator change "Atan" with "Shiftan".

Calculation of Qibla Direction for Indonesian Places

thumbnail
Indonesian Map's
Indonesian Map's
Indonesia is located on the east of the Ka'ba, and is in the south of the Ka'ba, so in logical direction, the direction of the qibla in Indonesia leads to the North West. there are some data that must be searched first to calculate the direction of qibla, that is:

1. Latitude of Ka'ba (φk)
2. Longitude of Ka'ba (λx)
3. Latitude Place (φx)
4. Longitude Place (λx)

For Latitude and Longitude data Ka'ba is usually constant / fixed, but some people vary in its determination, one of the Ka'ba coordinate value ​​used is 21˚ 25 ' 21,01" N and 39˚ 49' 34,33" E. For coordinate data for the place can be searched with various tools, such as GPS. visit this link. Determine Coordinate with GPS.

This calculation uses the assumption that the Earth is a sphere, so this way using the Spherical Algorithm theory. The steps must be taken as follows:

1. Finding the longitude difference (λd) with the formula : λd = (λx - λx).
2. Finding the qibla direction angle (QD) with the formula: Cotan QD = Tan φk * Cos φx / Sin λd - Sin φx / Tan λd.
3. Then finding qibla azimuth value (QA) with the formula: QA = 360 - QD

Average Qibla Azimuth of Indonesia
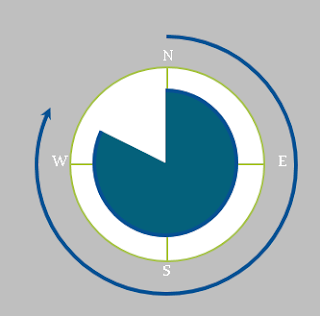
The direction of the Qiblah that we count, measured from the True North clockwise to the value of the azimuth angle. For the example calculations will be discussed at the next session.

The Change of Qibla Direction 2

thumbnail
In the previous article, has been described how the potential for changes qibla direction at someplace that caused by the earthquake. Visit this Link! The Change of Qibla Direction.

Now, in this article we will describe one example of the shift of coordinates that caused by the earthquake, and the changing direction of qibla. How big is it? And how big is the change?

Sample of Qibla Direction Change
Simulation of The Change of Qibla Direction
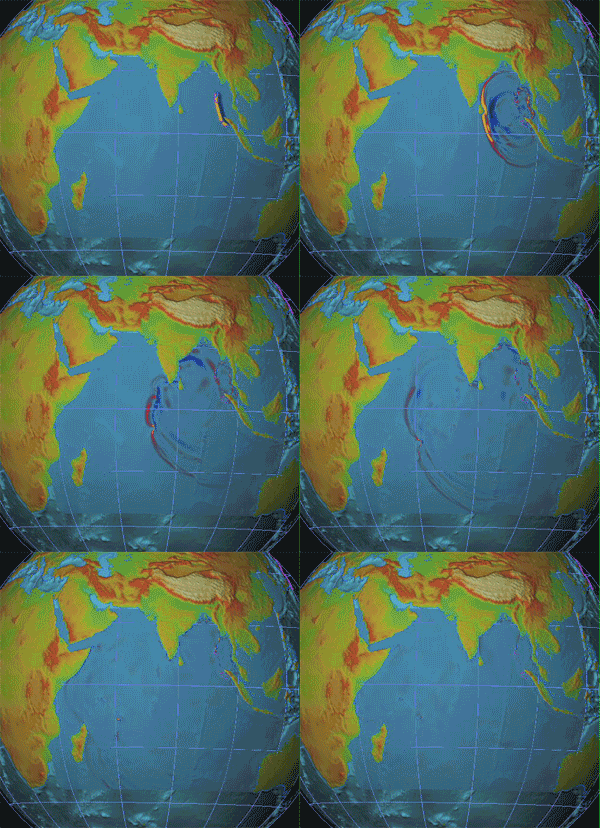
One of the mosques we have sampled is the Baiturrahim mosque in Ule Lheue, Aceh, Indonesia. One of the areas that was hit by the Tsunami on December 26, 2004 with a strength 9.3 Mw. The tsunami was the result of an earthquake in the Indian Ocean, which took victims from six countries : Indonesia, India, Sri Lanka, Thailand, the Maldives and Somalia.

Tsunami
Simulation of Tsunami 2004 in Indian Ocean
Source : Wikipedia.com
Please see some image below, these images we got from Google satellite imagery in Google Earth App, in a few different times.

The Shift of The Baiturrahim Mosque
Image 1 : The Capture of Baiturrahim 2004
Image 1: Satellite images taken on June 23, 2004, before the earthquake occured. in this figure there is the coordinate value of the roof of the Baiturrahim Mosque is 5˚ 33 '21.4 "N and 95˚ 17' 1.7" E.


The Shift of The Baiturrahim Mosque
Image 2 : The Capture of Baiturrahim 2005

Image 2 : Satellite images on January 28, 2005, images taken several months after the earthquake. the coordinates shifted to 5˚ 33 '20.67 "N and 95˚ 17' 1.61" E. coordinates shifted to the South West.

The Shift of TheMosque
Image 3 : The Capture of Baiturrahim 2009

Image 3: Satellite image on June 16, 2009, image taken 4 years after the earthquake. The coordinates again shifted towards the North East, the coordinates are 5˚ 33 '20.97 "N and 95˚ 17' 2.22" E

The Shift of TheMosque
Image 4 : The Capture of Baiturrahim 2010

Image 4: Satellite images on July 8, 2010, shifting South East to 5˚ 33 '20.9 "N and 95˚ 17' 2.39" E

The Shift of TheMosque
Image 5 : The Capture of Baiturrahim 2017
Image 5 : The last image on January 29, 2017, shifting North East to 5˚ 33 '20.95 "N and 95˚ 17' 2.54" E
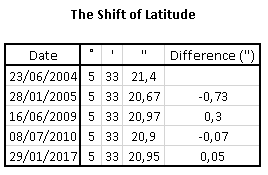
The Shift of The Mosque Latitude
Latitude Shift's
The Shift of The Mosque Longitude
Longitude Shift's
Of the drawings, the greatest shift occurred between June 23, 2004 and January 28, 2005. where between the dates there was a very large earthquake. The latitude shifts by 0.73 " to the South and longitude shifts by 0.09" to the West.

There was also a substantial shift, between January 28, 2005 and June 16, 2009, after I searched further, there was also some earthquake that occurred between that date, at Nias, Indonesia in 2005 and at West Sumatra, Indonesia in 2007. The latitude shift by 0.3 " to the North and longitude shifts by 0.61" to the East.

For the other date the shift is not too large, is between 0.05 "- 0.17", because there is no earthquake, the shift according to our, occurs caused by the shift of the earth's plate, but not too large, so it didn't cause an earthquake.

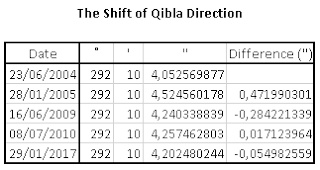
As for the qibla shift, I have calculated the direction of the qibla from some conditions with spherical algorithms calculation, can be seen from the following table:
The Shift of The Mosque qibla
Qibla Direction Shift's
The shifting direction of the qiblah that happened was very small, and almost no effect, less than 0.5". The 0.5" impact was caused by the tsunami that occurred on December 26, 2004. Then the impact of the Nias and West Sumatra earthquakes was less than 0.3", while in other condition, the qibla direction shifted less than 0.2" .

A shift in the direction of qibla is very possible, although the shift is very small, but it should be checked regularly, because if the slight shift is repeated several times it will produce a big shift.

Visit this link for the previous discussion. The Change of Qibla Direction 1

The Change of Qibla Direction

thumbnail
Is it possible to change the direction of qibla ? may be. the direction of qibla still facing the Ka'ba in Mecca, but the direction that will shift. qibla direction may occur, this is caused by a shift in the earth's plate, or earthquake.
The Chage of Qibla Direction caused by earthquake
Source : www.emaze.com
In a study conducted by Yusfania, she explained about the shift location caused by the earthquake that occurred in Sumatra or the Indian Ocean, the study resulted in the conclusion that the earthquake that occurred in the Indian Ocean in April 2012 led to a position shift of 0.3 - 2.4 meters to North East.

This is a fact that we must accept, because if the position of a place changes, it will certainly change the coordinates of the place, and then it will have an impact on the shift in direction of the qiblah at someplace.

Earthquakes are very common, especially in Indonesia. Indonesia is a country with earthquake potential. This happens because the location of Indonesia which is the meeting center of the plates of the Earth, among others, Eurasia, the Philippines, Caroline, Indo-Australia, Pacific and several other minor plates (Hamilton: 1979). In addition, this earthquake is caused by tectonic activity of the plates. Plates it continues to move like the Eurasian and Indo-Australian plates which have an average moving northward, while the Philippine plate movements tend towards the northwest (Hamilton: 1979 in USGS: 2011). Associated with the philipine plate, the Caroline plate has a movement towards the southeast in part of Aru riverbed and towards the northwest in part of Yap riverbed (Seno: 1992 in USGS: 2011).

Therefore, in order to minimize the change of direction of the qibla at someplace, the direction of the qibla should be updated regularly. Because if the shift is collected caused by several earthquakes, then surely the impact will be great.

Renewal of the direction of the qibla should be done by experts, Islamic Astronomer, The Jurist and also Geodesy master. Intensive research should be made to the direction of the qibla at someplace that should also involve the community. So that the public knows about the facts of shifting the direction of qibla caused by a shift of the earth's plate, and for the public to be more careful.

Visit this link for the next discussion. The Change of Qibla Direction 2

Advantages and Disadvantages of Handheld GPS

thumbnail

Advantages and Disadvantages of Handheld GPS

Actually there are many types of GPS, not just handheld / portable GPS, but also GPS Navigation and GPS Smartphone. For the first of these I will discuss in advance about the GPS handheld, and now I will explain the advantages and disadvantages of GPS handheld.
handheld gps
Handheld GPS
GPS handhelds have a high sensitivity in receiving GPS signals and some devices are capable of receiving dual satellite systems from GPS and Glonass. We can also determine the height of place and direction in an area with satellit signal, there are also various additional sensors, for example barometric altimeter and electronic compass so that the determination of height and direction can be done without using satellite signal. This is usually an option in the settings.

The use of barometric altimeter sensors usually must first be done altitude calibration somewhere. We can also use this barometric altimeter to plot air or ambient pressure from time to time, which can help to observe changes in weather conditions.

The advantage of this GPS compass is that it is not influenced by the magnetic field and can guide the direction accurately as it is guided by signals from the satellites (not the buit-in compass sensor). This tool is certainly very helpful when measuring the direction of Qibla.

The area is remote with no phone signal and does not have internet. We recommend choosing a handheld GPS device. Maps are already stored inside, though the images are very standard, such as the appearance of road maps and soil contours, the data maps in the handheld GPS more complete, but usually sold separately (for each country) and the price is quite expensive. Maps do not need to be installed or downloaded. Because portable GPS has been installed one country map when marketed.

GPS handheld is better, more durable, waterproof and suitable for outdoor activities. Users need not be afraid of the natural conditions, because handheld GPS devices or portable GPS are designed for nature activities. Using this GPS we can find the way when through high-sensitivity wilderness, which acquires satellite signals quickly and tracks locations in challenging conditions such as trees and cliffs.

The battery can be replaced because it uses AAA batteries. One portable GPS device can last up to 25 hours. Very suitable for adventure activities in areas far from electrical energy.

But the obstacle, GPS handheld in terms of price is still quite expensive, for a GPS device ranges between Rp. 2,000,000.00 to Rp.10.000.000,00 or about $ 150 USD to $ 750 USD.

The disadvantages of all GPS, including GPS handhelds are GPS will greatly affect the geographical conditions of where we are. GPS will work well if where we are still has a wide sky. The following will be described wherever the GPS will experience a weakness in its use:

1.When someone is in the forest. With the conditions of the trees are so much then the signals that can be received will be a little maybe even no depending on the width of the forest.
2.When someone is in the water or when someone is diving. Do not expect to use this tool when diving.
3. Electronic devices that can emit electromagnetic waves may affect performance degradation rather than GPS.
4. Buildings. Not only when inside the building, being between 2 tall buildings will also cause an effect like being in a valley.
5. Signals that bounce, eg when in between high-rise buildings, can disrupt the calculation of navigation tools so that navigation tools can indicate the wrong position or not accurate.
6. Glass film car, especially metal-containing.

Menus and Functions on GPS : Garmin 76 C/CSX

thumbnail
I will explain about some menus or functions on the GPS. This time I use GPS Garmin 76 C/CSX. Some GPS devices also have a similar functions.

How to operate Garmin 76 C or 76 CSX?
GPS Garmin 76 C / 76 CSX
1. Key Functions

Inside GPS 76 C there are several buttons that work include to:
A. Power button: Turns the unit on or off. If this button is pressed and released, it can work to adjust the backlight.
B. Zoom In / Out button: To set the size of the scale.
C. Find Button: To go to find menu page and display mob.
D. Quit button: To cancel data entry or close the page.
E. Page or Compass button: To go to the main page and turn the electronic compass off.
F. Menu Button: To enter options, confirm messages or data on-screen. This button can also be used for marking Sign and Waypoint.
G. Rocker Keys: To start moving lists, highlight fields, on-screen buttons, icons, enter data or move to the map section.

2. Getting Satellite Data

For the process of revenue data from satellite, then we must pay attention to the place and condition around. It is advisable to use the GPS in the open and have a wide view. The weather conditions must also be in good condition. For the steps are:
A. Turn on the GPS by pressing the power button. If the GPS has been turned on then it will say "Welcome". The page will quickly face the satellite page.
B. Observe the satellite page and GPS status message when it appears at the top of the page, and soon it will look like a GPSmap. This indicates it will start to search for satellite exploitation status. Not long after that will automatically show our position (latitude and longitude). Visit Determine Coordinate of Place with GPS for more info.

3. Selecting a Page

For all required information or data can be found in four main pages (display screen). These pages include satellites, maps, pointers, and menus. The trick is to press the page button to find the pages.
A. Satellite page: provides a reference for tracked satellites.
B. Page trip computer: provides data and information related to the science of shipping.
C. Page map: provides a view of a map and reference our navigation movement.
D. Page compass: provides guidance for a purpose and direction.
E. Page altimeter: provides path and pressure elevation.
F. Main menu: an existing directory in GPS to specify other settings.

4. Define Waypoint

Waypoint is a marking of places obtained by satellites in a GPS. To mark a place, we can access in the Find Menu by:
A. Press the page button and select the menu page. Press the Up or Down button and select the "Mark" section.
B. Press the enter key. The mark waypoint page will appear with the word "OK?", Hit enter. Waypoint has been stored in GPS memory.

5. Go to the Waypoint Menu
To enter the waypoint we have marked, then we use the Go To facility. How to use it is:
A. Press the page button and select the menu page. Press Up or Down button and select "waypoint". Press Enter. The waypoint page will appear.
B. Press the Up or Down button and select the tab that contains the desired waypoint name and press Enter. The existing waypoint review page will appear.
C. Press Up or Down button to select "GoTo" and press Enter.

6. Exploration on a Waypoint
In the use of the "Go to" facility, we will be directed to follow the directions on the waypoint. The directions provided are N, S, E, W (North, South, East, West). If we cancel, we can use the compass pointing stick to divert the direction toward us. The steps are:
A. Press the page button repeatedly until the compass page is shown. This page contains a bookmark that marks the direction to go.
B. Press the quit button to move to the map page and watch our progress toward the waypoint. The pointer line will show the map and the position arrow movement as we move it.
C. Press the quit button again to move to the travel page. This page provides travel data such as a travel odometer, maximum speed, and more.
D. To stop navigation, press Menu then select stop navigation and then press Enter.

7. Cleaning Track Log
If we have used GPS for multiple trips, then the map view will be full because storing tracks or paths that we have been through. To use this facility the way is:
A. Press the page button and select the menu page.
B. Press Up or Down button and select "Tracks".
C. Press Enter. Use the Up button and select "Clear". Press Enter.

8. Using Map Page 
To use the map page can be done by:
A. Press the page button to go to the main page to the map page.
B. Press the menu button to navigate to the map page selection.
C. Start moving and observing the position arrow on the top of the map. Use the Rocker button to move and move highlights a map item or look into other map areas.

Determine The Coordinates of a Place with GPS.

thumbnail
In the calculation of Islamic Astronomy, the thing that is always required is the coordinates of a place. Many ways and tools can be used to know these coordinates. One of the most famous ways is using GPS (Global Positioning System)

GPS is a navigation and positioning radio system that utilizes satellites as a means of communication. This tool is usually used in vehicle navigation, be it land, sea or air vehicle. Ship and aircraft communication with the station is needed, in order to avoid accidents. GPS is used to know each ship or aircraft position, then reported to the tower / station supervisor at the nearest port or airport.

This GPS will monitor signals from satellites, then GPS will accept the position of the place be it latitude, longitude or altitude place on Earth.

In the Islamic Astronomy, GPS that easy to use is a type of handheld GPS that can be taken anywhere.

GPS has a different level of accuracy, depending on the brand and type of GPS. but overall the tool is quite accurate in determining the coordinates of a place or area.

In this explanation, I will practice using GPS Garmin 72H, but overall, various GPS has a similar way to operate GPS for coordinate determination. The way is :

1. Turn on the GPS in the field, not in the room, around tall buildings, tunnels, and dense forests.

2. Wait a while, about 1-3 minutes, so that GPS receives satellite to make configuration latitude, longitude and altitude data complete.

3. The minimum number of satellites captured to generate coordinates is 4 satellites. And wait a while until the "Location" or "Accuracy" sign shows the smallest number. That sign is the maximum error of the GPS point being, which is predicted by GPS satellite.

4. Then record the coordinates that appear.

determine coordinate with gps
Garmin GPS 72H
Souce : https://www.amazon.com
Example image above, the resulting coordinates are 38 degrees 51,498 minutes North Latitude (N) and 94 degrees 47.838 minutes West Longitude (W).

5. if you want to know the height of the place, press the "page" several times until entering on the page high information place.

Good luck!

Islamic Astronomy Tools : Celestron Nexstar 4 SE

thumbnail
In studying a science, of course there are theories and also field practice, studying physics and biology must definitely practice in the laboratory, learning sports science should definitely practice in the field, learning the language of science should also practice in the language laboratory.

The need for practice in learning a science is a necessity, as well as the science of Islamic Astronomy. according to some people's understanding, Islamic Astronomy deals with the calculations of heavenly bodies, but they are useless if they are not applied in the field. there are several tools that become the needs of the astronomers, one of which is the telescope. In Islamic Astronomy the telescope is usually used for rukyatul hilal (observing the crescent) in the determination of lunar calendar, or for eclipse observation.

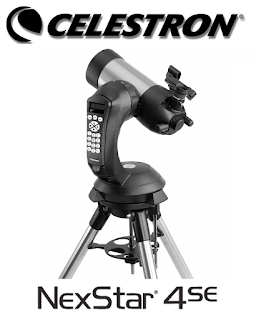
Celestron Nextstar 4 SE
Source : https://www.celestron.com
This time I will discuss a bit about the use and specifications of Celestron Nexstar 4 SE telescope.

CELESTRON NEXSTAR 4 SE

The telescope has two functions, the first of which serves as a horizontal telescope, and the second serves as an equatorial telescope. This is one of the advantages of this telescope. for the tube type is a reflector telescope with a cassegrain telescope design.

Telescope parts:

The Part of Celestron Nextstar 4 SE
Source : https://www.celestron.com
1. Optical Tube, the main part of the telescope, in this section will occur light reflection, which will then produce images of distant objects.

2. Star Pointer Finderscope, this section serves to make it easier when shooting sky objects.

3. Eyepiece, this part is the ocular lens of the telescope, this lens can also be changed to adjust the magnification of the telescope.

4. Focuser Knob, this section is used to adjust the focus of the telescope image. This section should always be arranged, especially if we replace eyepiece or change of observer, so that picture is always sharp.

5. Threaded Photographic Adapter, an adapter for SLR / DSLR cameras that have been connected by T-ring

6. Flip Mirror Control, Flip Glass used for image selection, whether light is forwarded to the camera ?, or is reflected to eyepiece ?.

7. Battery Compartment, Battery Place, this telescope needs 8 batteries to run it.

8. Tripod, this part is the foot of the telescope that supports mounting and tubes. This section is also commonly used to regulate the flatness of the telescope.

9. Accessory Tray, place to put various accessory, like eyepiece, T-ring. On the side of the Accessory Tray there is a vertical stick, this stick is used to support when we will use the telescope with equatorial model.

Celestron Nextstar 4 SE Equatorial Mode
Source : https://www.celestron.com
10. ON / OFF Switch, the button to turn the telescope on and off, beside this button is also an AC Adapter input which is used to run telescope without battery.

11. Hand Control, this part is a remote used to control the telescope.

12. Liquid Crystal Display, Screen on the remote, inside is also usually listed coordinates of the telescope and also objects observed celestial objects.

For how to use? please visit this link Operational Celestron NexStar 4SE.